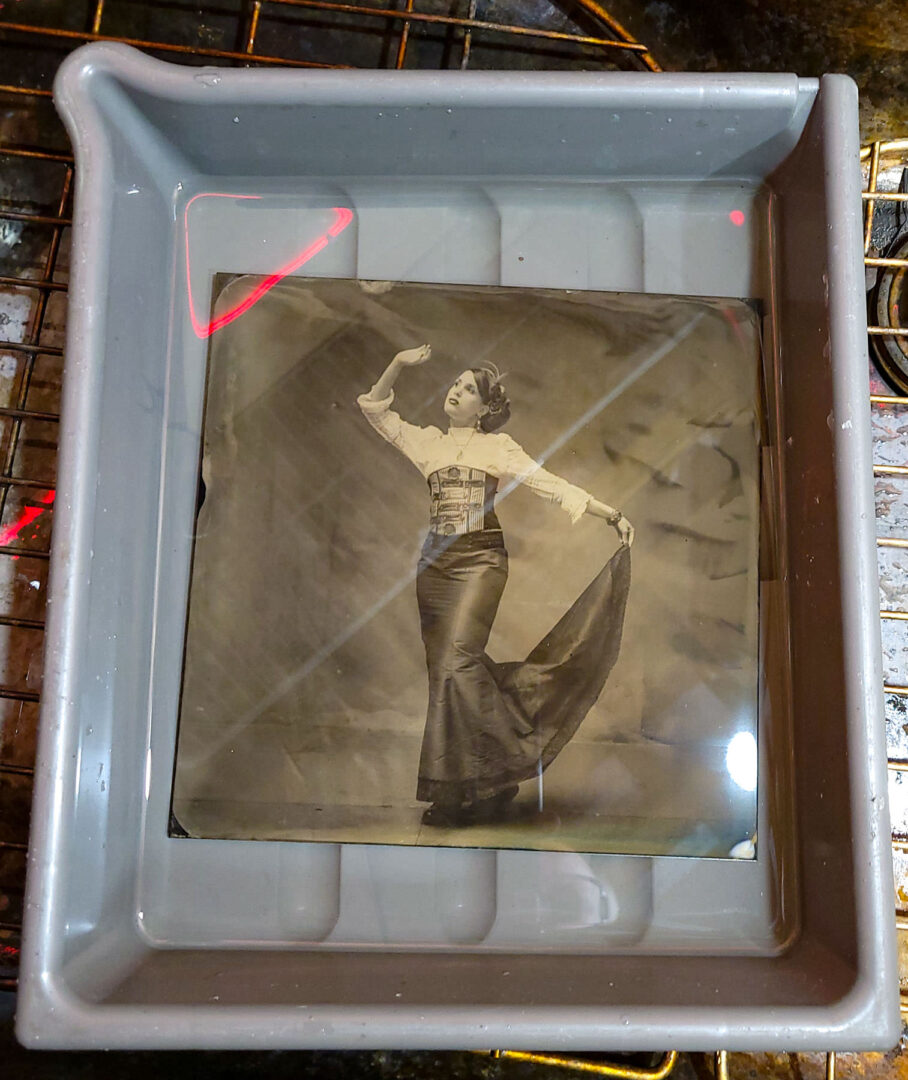
Is it live or is it…

There was a series of commercials from back when my age was a single digital. They were for Memorex cassette tape and my favorite featured Ella Fitzgerald breaking a wine glass with her voice. They showed Ella doing the glass break live and then they broke another glass with a tape recording of her voice. So the message was you don’t need Ella Fitzgerald, all you need is a tape recording of Ella Fitzgerald.

Fast forward to today and we see computers making pictures using algorithms deceptively called “AI”. The implication is you don’t need real photographs because you can just have the computer whip up a composite of a thousand other photos. This is nothing new, digital photography has been “Photoshoped” for decades so that one becomes distrustful of images.

I will go out on a limb here and declare that a recording of Ella Fitzgerald is a poor substitute for a real live performance. A faked photograph is a faked photograph no matter how sophisticated the algorithm.

At Sun and Silver.photo I do real images of real life. No Photoshop, no adjustment, no fixing it in post; WYSIWYG (what you see is what you get). In a world awash in fake images I like that there are still honest images being produced.

So, is it live or is it Memorex? It is live!

Winter Tintype portrait of a woman model in a jacket

Want a real live portrait? Contact Me to set a session up!

Back to my Blog


Postscript

I also do digital photography, mostly weddings and portraits, at Jalanlee.com. Do I deliver totally untouched photos to my clients? No, that is not possible. Digital photographs are always adjusted for color, brightness, tonal ranges and a host of other factors. But do I deliver “honest, real life” images? Yes, most of my images try to capture people as they are. Images are edited for stylistic choices and not to deceive. And if an image is used in a composite it is clearly identified as a fantasy image.

Behind The Scenes of Wet Plate Collodion Photography

Wet Plate collodion images being prepared for shipment

Why does a wet plate cost so much? A question I sometimes get, although not too often. Part of the cost is the part my clients see – the actual image capture. But the session is actually the smallest part of making historic tintypes and Ambrotypes. So let’s go behind the scenes of wet plate collodion photography and see some of the work that goes into making your historic image.

Chemical Preparation

The foundation of the process is chemistry. Before anything else happens there are a bunch of chemicals that have to be purchased and mixed. Collodion has to be mixed with alcohol and ether and bromides to make the plate coating. Silver nitrate has to be mixed into a 7-8% solution for the silver bath. Silver nitrate is dangerous for your skin and eyes so a lot of protection has to be worn when handling silver baths. Developer has to be mixed along with the fixing solutions. I also mix up my own Sandarac varnish.

Aluminum and Glass Plates

I use mostly recycled & antique glass for my Ambrotypes. I have to search out old windows and other sources of glass. I then remove the glass, clean it and cut to size. The edges of the cut glass are sanded to remove sharp edges. Then the glass is cleaned again and coated with albumin (to help the collodion stick).

The generic name “tintype” comes from the past when actual tin sheets were used for plates. Now I actually use trophy grande anodized aluminum plates. The plated can come cut to the various sizes or I buy large sheets and cut them to size myself.

Plate Rinsing and Drying

After fixing the plate I need to do five steps of washing. The plates are washed with tap water four times followed by a final distilled water rinse. This step removes any trace of residual chemical that could cause problems 100 years in the future. The plates are then left to air dry on racks for at least 24 hours.

tintypes drying on a rack

Varnishing & Coating

The final step in plate preservation is varnishing. I use the traditional Sandarac varnish which is a blend of frankincense and lavender oil. The plate is warmed up over an alcohol flames, varnish poured on the surface and drained. The plate is then reheated over the flame carefully (because the varnish is flammable) to set. The plate is then racked to air cure for at least 24 hours.

The varnishing step is really fun because of the wonderful smell of lavender oil with the spiciness of frankincense!

If your plate is an Ambrotype on clear glass I can also blacken the image to render it a positive. I love to use a sheet of black, or other color velvet. I might also coat the image with traditional asphaltum.

Mounting and Framing

Finally, I get the plate ready for delivery to you my client. Each plate is signed and a Certificate of Authenticity is also signed. I make my own sleeves to hold your plate. I can also frame the plate or add a chain mount or a magnetic mount if you like. Often I also package your plate for shipment and run to the UPS store or the USPS facility.

tintype pictures on display wall

Now that you have seen behind the scenes of wet plate collodion photography you will never ask “why does a plate cost so much”?

I almost forgot, after all that work, I also have to clean up and resupply my mobile darkroom!

You know, maybe I should raise my prices!!!

Back to My Blog

Mobile wet plate darkroom

Tintype Principles for a New Year

Tintype principles for a new year. I had so much fun in 2023 making 19th century photography – tintypes, Ambrotypes, salt prints and cyanotypes. I think 2024 is going to be an amazing year. Often people choose New Years Day for resolutions but I would rather talk about core beliefs or principles.   

Resolutions are usually a set of “do” or “don’t do” activities. Lose weight, exercise more, make more portraits are just a few examples. So instead of a list of things to do, or things to change, in the coming year I would rather reinforce the “whys” of what I am doing.   If you understand the basic drivers of what you are doing the individual activities will naturally follow.

So here are my basic principles of why I create tintypes and other visual arts…

  • I create to honor the Creator of everything
  • I want to make portraits that capture the inner “spark” we all have
  • I want to share images that show joy and love in a world where ugliness seems to get the most attention
  • I want to build relationships with my clients and models – it is not the final image that counts, but rather the moments we share together

I create to honor the Creator of everything: All of the things I have learned in my life, especially my career as a scientist, show me very clearly that everything in the universe was created by God. Our Creator took random chaos and made order and life. So when I create something, when I follow the example of my Creator, I honor my Creator.  

I want to make portraits that capture the inner “spark” we all have: All people have a spark of life in them. This spark animates our bodies and our minds and is a part of the Creator. A good portrait can capture a bit of that spark for others to see.

I want to share images that show joy and love in a world where ugliness seems to get the most attention: The “news” is almost always bad! People seem to be drawn to bad news or ugly behavior. I want to show that there is love and beauty in the world. I want my images to be positive and uplifting; to tell inspiring stories. 

I want to build relationships with my clients and models – it is not the final image that counts, but rather the moments we share together: I think the common thread in all of my photography is rewarding interactions. I do landscape and still life photos but enjoy people photography more than anything else. The biggest appeal of tintype, all wet plate methods, is that they are slow. You naturally take more time setting up a photo when it takes 15 minutes then when you crank out 15 frames a second. Because of this a tintype image will have more memories attached. The tintype is a reflection of the time we spent together, our conversation, our planning. 

I hope to do lots more portraits and create a lot of inspiring images in 2024! If you like my principles why not contact me to start a discussion of your portrait or project? 

Featured photo is “Santa Heading Home” a 5x7in tintype. You can see more of my tintypes in my Portfolio

Back to The Blog

This post is also shared at JalanLee.com my digital photography site for weddings, events and portraits.

2023 Year in Review

What a year we’ve had at Sun and Silver.photo! The mobile darkroom was finished by Spring and operational all Summer. We did a lot of location shoots over the Summer. Last year I shut down for the Winter as the cold weather makes the chemistry not work as well. But this year I added a small heater to the darkroom and will be trying to keep making tintypes all through the Winter (at least when it is not too horribly cold).

I also did a lot of cyanotype and salt prints this year and sold a lot of them at art shows. The plan next year is to do tintype pop ups at shows and see make portraits.

Here is a short video of just some of the pictures I made in 2023. So many memories and I also did a lot of learning. The craft of wet plate collodion is not an easy one but so rewarding when you make a good image!

Back to the Blog

Check out more videos on my YouTube Channel

Tintype Wall

One of the problems with being a wet plate collodion tintype photographer is all the plates start to stack up! You end up with a big pile of plates waiting for mounting or display.

I started on my backlog this week and did some experimentation on mounting systems. For these plates I decided to drill a couple of tiny holes at the top and hang them with a chain. The best part is the chain slips off so the plate can be mounted in a frame. The holes won’t show or will not be noticeable. The removable chain also lets me put the plate in my paper holders to protect during shipment.

The hardest part of the exercise is how much I like all these plates! They will get hung on my wall and I will enjoy them but they are all for sale! So (hopefully) they will all go to someone else’s home in the near future and my wall will be left bare!

Of course, I just need to get out and shoot some more!

Back to my Blog

Check out my Etsy shop for current plates on sale Etsy/shop/sunandsilverphoto

Location Wet Plate Photography

Wet Plate collodion session using my mobile darkroom. The darkroom allows me to do portrait sessions throughout Wisconsin and Upper Michigan. This session was on a state trail near Neenah. Just capturing some 8×10 inch landscape tintypes for sale on my Etsy site

Mobile wet plate darkroom

Here is a nice picture of my Intrepid 8×10 inch large format camera. Intrepid is a UK based company that manufactures large format cameras and accessories. I use vintage lenses – over 100 years old. But I opted to have a new camera built for my business. Nothing wrong with an old camera but I wanted to support someone building new cameras so that there would be more cameras in the future.

Intrepid 8x10 wet plate camera

The most magical moment occurs when you fix and wash the plate. Here is a plate with the image emerging in the fix bath.

Washing a tintype

Then after a good wash I rack my plates in the sun to dry. I will varnish the plates when I get them home. I use a traditional varnish made from frankincense and lavender oil. It protests the image and smells wonderful!

tintypes drying on a rack

I also use my mobile darkroom for location portrait sessions. Want to learn more? Check out my Contact Page where you can send me a message or book a session.

You can also see my Collodion Portrait FAQ for more information

Back to my Blog

Asylum Point Magic

She came from the west, bringing hot weather, humidity and maybe a bit of magic. We met at Asylum Point – once the site of the Northern Asylum for the Insane. A little north is the modern Winnebago Mental Health Institute. The asylum point lighthouse was built in 1937 and still provides a beacon for boaters on Lake Winnebago.

The old and strange art of wet plate collodion (Tintype) photography is also shrouded in mystery. One day the spirits align and perfect images appear as if by magic. On other days, things conspires against you and every exposure becomes a dangerous adventure.

This was a perfect opportunity to test out the impact of temperatures in the 90’s on wet plate collodion. Hot weather is not a friend of tintypes! Exposures were troublesome and developing progressed much too fast to control properly.

Of course, we seemed to be haunted by a continuous passage of amazing and wonderful “travelers” through the air above our heads… or maybe it was the sad vibrations coming from the multitude of former mental patients buried in mostly unmarked graves a few hundred yards away. Certainly, I would guess that among the descesed were a goodly number of wet plate photographers driven to insanity by their dark art (or maybe the ether fumes).

But somehow we managed to fight through the heat and salty eyes and produced some magical and wonderful images.

Thanks to Andy for protection from the dark arts!

About the Model: Denise is an artist and photographer. She specializes in fantasy photography, fairy tales, folk legends and mythology. Many thanks for helping me learn and grow as an alchemist! You can follow her work on Instagram @denisehouk


Back to the Blog

Interested in doing a themed wet plate shoot? Send me a message and we can discuss your project. I do photos all around the Fox Valley Area of Wisconsin. Email me at jeff@sunandsilver.photo

Mobile Darkroom Build

My mobile darkroom build is going very well. The return of Winter weather had slowed things down but sometimes you just have to put your head down and keep on moving forward.

So why a trailer? Well, a lot of wet plate photographers use a dark box or small tent. These have the advantage of being portable but they suffer from not being very comfortable to work in. I like space when I am working! While the dark box can be visually pleasing tents are definitely ugly! I also wanted something that gives a sense of occasion to my outings. A trailer, as I conceive it will make people wonder “what is going on over there?” If done correctly, it will bring them in and maybe encourage them to join the party!

A note on my methods: I am borrowing a lot of the construction from how an RV or camper is built. Strong enough to withstand the elements and 75 MPH winds but still lightweight for towing. This means 2 inch thick walls and honeycomb construction. My build will not be as aerodynamic as most RV’s. I am going to compromise the slipstream to make it more aesthetically pleasing. I don’t plan on towing long distances so a little more wind resistance is not an issue – I hope!

After a lot of searching I found a suitable trailer. I wanted something a little wider but not too long. Also not too heavy as I would be pulling the thing around. I finally found a 5 1/2 x 9 foot trailer that was perfect!

As you can see, I picked up the trailer on a beautiful Fall day with hopes of continued good weather. I stripped the trailer of the wood sides and old flooring. I cleaned up the frame and gave it a good coating paint. I also welded up the tilting mechanism so give the trailer more strength.

New plywood flooring was installed. I used ground contact treated plywood figuring this part could get wet. I glued the plywood to the frame rails to both hold it in place and to keep the floor from squeaking! Once the walls are in place the glue will be reinforced with bold on brackets. Here is a shot of glueing down the floor (I know that weight set would come in handy).

I prefabbed the walls in my garage and then added them onto the trailer. As you can see from the picture Winter has arrived! The walls 2 inches thick with a 1/4 inch plywood outer skin. I will add insulation later and some sort of interior finish (not decided on what just yet).

After the side walls, the front was added. This allowed me to square up the sides and give some dimensional stability to the structure. You can see from the picture above that the internal framing is not done yet. I am waiting until I pick up the windows to finish the framing. Insulation will be the last step.

Here is a photo of the 3 sided darkroom – starting to look like something now!

A note on the vertical 2×4’s on the outside. These are just for support and will be removed when all the walls on are and bolted down. You can also see my scissors jacks on the corners. I will use these when the trailer is parked to level everything and give some stability.

Good thing I got the walls up when I did because the last week has been nothing but snow, rain and sleet! But with some temporary roof joists and a big tarp my build survived the weather with no damage!

So what is next? I hope that the past week was “March coming in like a Lion” and the weather will moderate for construction. Windows and door will be next and then I can finish the framing and put on the roof. Then it’s just finishing work and installing the interior work and storage surfaces. My plan is to have everything done by the end of March to Mid April. Watch for more updates and a video of the build when everything is done!

Back to the Blog

Collodion Tintype Portrait in The Summer

collodion tintype portrait

Summer is for outdoor collodion tintype portraits! I am so blessed that I have friends who are willing to pose for practice sessions. A good friend braved the Summer heat to pose for an outdoor practice plate. This is an 8×10 inch tintype made with the collodion process.

They say the practice makes perfect. But I don’t think that is true. What I think is practice + reflection + adjustment puts you on the path to “good”. You have to reflect on the result and think about what worked and what could be improved on. Then make a change and try again. Sometimes the changes make things worse! But then you know what not to do. Sometimes the changes are are smaller than the random stuff that happens! Sometimes you do everything right and get a “bad” result followed by errors which come out really well.

But that is the process of learning and growing! There are no shortcuts, no wikipedia page of blog post that will give you instant success. Try, and try again is the only method to learn and grow!

Back to My Blog

Speedotron Capacitor Safety

The capacitors used in a Speedotron flash power pack are powerful and potentially dangerous if not cared for properly. This is especially true when the unit has not been used for a long time. There is a simple way to reform the capacitors after extended down time which ensures they are safe and fully functional.

Every day is like Christmas, at least it is when you believe! I am building up my wet plate kit and the newest member is a wonderful Speedotron 4803 power pack. My current pack is a 2403 which can deliver a mighty 2400ws of flash power. That is enough for wet plate portraits if I keep the aperture open and place the lights close. But, there are times when I could use more power. This is especially true when I have a big group to light or when I want to use a softbox to enhance the light.

So I have been looking for a 4803 power pack for some time and not finding any close to home (at least not in my price range). But yesterday I made the 3 hour drive to Brookfield, IL and picked up a beautiful 4803 power pack. This unit delivers twice the light for an eye popping 4800 ws.

Why Speedotron?

I like these units for a couple of reasons. They deliver a good amount of power. They are “workhorses” meaning they are tough and seldom break. The lights are pretty affordable on the secondary market and the flash tubes are too.

The problem with capacitors

All flash units are based on a high voltage capacitor delivering a lot of power to a flash tube in a very short time. Speedotron capacitor safety is especially important because the units hold a lot of energy! The capacitors in these units are a kind of battery that uses thin aluminum and paper sheets. They are rolled up together with a coating of chemical paste. The rolls give a lot of surface area to hold an electrical charge. The aluminum develops a very thin layer of aluminum oxide which acts as a insulator. This allows the charge buildup and keeps the capacitor from shorting out. “Shorting out” is another way of saying “catch on fire and blowing up”!

The oxide layer is naturally maintained when the capacitor is charged and discharged regularly. So like many things, capacitors like to be in service instead of sitting around. So when a flash unit is not used for a while the oxide layer can break down. A bit of breakdown will reduce the flash power because the capacitor will not fully charge. If the unit has sat for long enough the oxide breakdown can be severe enough to cause a failure the first time the unit is powered up.

So what is Capacitor Reforming?

But all is not lost! The oxide layer can be easily reformed in an old capacitor if you follow a simple procedure. The basic recipe is to apply a very small voltage to the capacitor for a long enough time. This reforms the capacitor and allows it to safely function at full voltage. Reforming voltage can be around 5 to 10% of the full load voltage. The time can be as little as 5 minutes for small capacitors up to several hours for large ones.

Speedotron Reforming

The operating manual recommends reforming whenever the unit has not been used within 3 weeks. They recommend plugging the unit in, turning on the power and leaving it on for at least 3 minutes before firing the flash. Yes, that is it!

If your power pack has been sitting for a lot longer (or you are unsure how long it has been sitting) I recommend a modified turn on procedure:

1) Set the power switch in the off position,

2) Set the dial to full power,

3) Plug in the power cord,

4) Flip the power switch to “on” for about 1 second and then back to off,

5) leave the unit off for 10 seconds,

6) Repeat steps 4 & 5 several times until the “ready” light comes on – then leave the unit on for at least an hour before flashing.

My 4803 was fully functioning when I picked it up so the capacitors were in safe condition. However, the unit has not been used a lot the past few years so I decided to reform the capacitors a bit just to be safe. So it is plugged right now and I will leave it sit powered up for a couple of hours. That’s it!


Back to my Blog


Collodion Portrait Session FAQ

So you booked your portrait session.. Awesome – I am so excited!

Collodion sessions are a little bit different from digital photo sessions. The mood is slower paced and much more relaxed. We only produce a small number of images so it pays to plan things out in advance. Collodion is also a one-of-a-kind image process so there is always a bit of randomness to the final image. Of course, the surprise is just part of the fun.

So here are some frequently asked questions..

How do I book a session?


Go to my Contact / Booking Page

How many people can be in a picture?


The group size is a function of how much space we have. In the studio we generally are limited to 2 or maybe 3 people. Large groups need to be outdoors to have good light and enough space to get everyone in the frame. The exposure can last from 3 to 10 seconds so it is important that everyone hold as still as possible or they will be blurry. Very young children can be lots of fun!

What about pets?


I welcome pets but the quality of the picture does depend on them being able to hold still for a few seconds!

How long does a session last?


Usually an hour to an hour and a half. Depends on how many images we want to produce. Each image will take about 20 minutes total time.

So I have to pose for 20 minutes?


No! The actual posing time is less than 10 seconds. The rest of the time is spend preparing the plate and developing it after exposure.

Do you use flash for lighting?


My preference is to use natural light for portraits. I think it is the most flattering. But I can use flash photography if there is no sun or we are shooting indoors. The flash is very bright!

What should I wear?


Anything you want! Because of the special nature of collodion people usually put more thought into their wardrobe. Sometimes people like to wear period clothing to keep the “antique” vibe. While others go for a more casual style. But anything that makes you feel special is great. Generally it is better to avoid busy patterns as they can be distracting.

What about colors?


Collodion is a black & white process (monochrome). So colors come out in special ways. Here is a handy guide:

White looks white
Black looks black
Blue comes out white to light grey
Green will turn out dark grey to black
Red is dark grey
Orange is the new black

Here is a color wheel showing how colors come out in collodion

collodion color wheel


What is the process for taking my portrait?


We will set up the location and poses

I will get the camera adjusted and focused

You get to chill for about 5-6 minutes while I go into the darkroom to get a plate ready

Do the real pose and take the picture

It will take 3-5 seconds to get the picture so you will need to hold as still as possible for this time!

Back to the dark room to develop the picture – less than 5 minutes

I will bring the picture out into the light and you can watch the image emerge in the “fixing” bath

The picture goes into the rinse and we can setup for another picture!


When do I get my picture?


The plate will need to be varnished and mounted (if you ask for framing). Most always your finished plate will be ready within 24 hours. I always varnish the plates to protect them. My current varnish is a mixture of Frankincense and lavender oil and this requires a bit of time to cure and harden. If you are not local to pickup I will ship the final plates and you should have them within 3-5 days.


Haven’t book yet? Well click here for my portrait booking page!


Thistles in Collodion

wet plate collodion thistles

When life gives you thistles – why make a collodion wet plate?

I made a series of 5×7″ tintypes and Ambrotypes (images on glass) yesterday and am so pleased with how the images turned out! I harvested a variety of plants in the morning for still life images but stuck with the thistles all day. Sometimes you get in the “zone” and time fades away and things just flow. Before I knew it dinner time was approaching. So I shut down image capture and set up varnishing my day’s production. Like all my plates, this set was preserved with traditional frankincense in lavender oil finish. My work room smells so wonderful!

This tintype can be purchased in my Etsy Store for $39.99

Back to the Blog

Close Menu